Showing posts with label jewellery supplies. Show all posts

Friday, 29 June 2012

Jewellery Making Basics

Making your own jewellery is not as difficult as most people seem to assume. Once you have a grasp on the basic techniques envolved in making Jewellery then thats when the fun starts. You'll be able to make your own Earrings, Necklaces, Pendants and Bracelets.

For most jewellers, making jewellery started off as a bit of fun which eventually led to them turning it into a business - either full time or just part time to supplement their existing income.

Tools required :
Round Nose Pliers
Flat Nose Pliers
Wire Cutters

How to open and close a jumpring

Grip the jumpring with flat nose pliers and twist it open with your other hand.  Never pull apart to open as this will distort the shape and the jumpring won’t close properly.
Attach the open jumpring to another jumpring, chain or jewellery finding and twist back to close.


How to form a loop using a Headpin


1. Thread beads onto a Headpin.  Using Flat Nose Pliers  bend the excess pin to form a right angle.


2. Trim the end using cutters to leave approximately a 1cm length.  Then grip the end with round nose pliers and roll the pliers back to create a loop.


3. You may need to release the Headpin and continue the rolling action to complete the loop.


How to form a wrapped loop using a Headpin


1. Thread beads onto a Headpin.  Using Flat Nose Pliers  bend the excess pin to form a right angle.


2. Use Round Nose Pliers to grasp the Headpin near the bend and wrap the tail of the pin all the way around to form a loop.


3. Hold the loop in place and wrap the remaining wire around 2-3 times to cover the gap between the loop and bead.  Cut away any excess wire and gently flatten the end.


    Monday, 12 September 2011

    What is Silver Filled Jewellery?

    The simplest way of explaining the definition of Silver Filled Jewellery is to first explain the definition of Gold Filled.

    Gold Filled (alternatively known as 'Rolled Gold') is basically a base metal with a solid layer of Gold bonded to its surface.  The gold content in the component is 1/20th by weight of 12 karat gold. Gold fill items do not tarnish and offer a much cheaper option to 9ct.Gold.

    Gold Filled items have a 50,000 to 100,000 times thicker layer of Gold than normal Gold Plated items giving most Gold Filled Jewellery the same look and feel as 14 Karat Gold jewellery.

    Gold Filled was mainly created to reduce the costs for Jewellery without sacrificing the perceived value or beauty and to still retain the durability and long term wear.

    So, as with Gold - the necessity for a cheaper alternative with the same perceived qualities arose for Sterling Silver due to its ever increasing price.

    Silver Filled was created to bridge the gap between Sterling Silver and Silver Plated. It is created in the same way as Gold Filled - A solid layer of Sterling Silver bonded to the surface of a base metal. This layer, as with the Gold Filled is hundreds of times thicker then Silver Plating.

    Silver Filled jewellery is mainly found in two qualities, one will have at least 1/20 (5%) Sterling Silver by weight and the other will have 1/10 (10%) Sterling Silver by weight of the item. International Craft carry the thicker coating 1/10 Silver Filled components.  The thicker coating of .925 silver better serves making quality jewellery. Silver Filled wire has almost the same properties as Sterling Silver and is as easy to manipulate and does not flake or chip as with Silver Plated

    As mentioned earlier, Sterling Silver prices have risen to record highs, so for most jewellery designers this has caused enormous problems with the value of their designs and are now opting for Silver Fillled Findings because they looks just like Sterling Silver Findings and are a fraction of the cost ( 25 - 50% cheaper ) giving their designs a higher perceived value.


    Friday, 2 September 2011

    Digital Images for Pendants & Charms


    PaperStreet Supplies carries a large supply of printable images for use in altered art photo charms, bottle cap pendants, scrabble tile charms, domino pendants, magnets, pocket mirrors, pin-back buttons and more. With instant downloads you can start your mixed media or altered art project immediately!

    Digital collage sheets contain printableroyalty free source images for use by artists,crafters & pendant makers, packaged neatly together into in digital file which can bedownloaded & printed over & over again. The digital images can also be manipulated using most photo editing programs (ie, Adobe Photoshop or the freeware Paint.NET).


    PaperStreet's images are also great for collage, assemblage, scrapbooking, decoupage, and many other crafting projects. Collage sheets are available as a high resolution JPEG files types. Download links are activated upon payment review (usually just seconds).  Downloads are very reasonable and look out for their 'Buy 3 get one free' coupons which are always available on their website.

    Choose from a vast selection of image sheets which include the following and many, many more

    Steampunk backgrounds, Fantasy, Victorian, Vintage, Clockfaces, Gothic, Butterflies, Dragonflies, Birds.....


    The image files are downloadable as A4 sheets, with which you have the option of either selecting square images or round images in various sizes ( The above sheets contain 1"(25mm) Square images)


    Print and cut out these images for use in pendant blanks to create personalised pendants, charm bracelets and rings.

    Seal pictures in with either Glass cabochons or Glossy Accents glaze.


    Tip: If you want to use the 1" (25mm) images with our 20mm Pendant settings , then all you need to do is the following: When printing click into 'Printing preferences'. Then Select 'Effects'. Now change the "% of normal size" to 80 and print. This will reduce the 25mm images to 20mm.


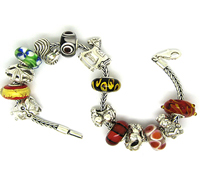
    Use our Pendant Settings with our Domed Glass Cabochons for a professional finish. As you can see from the bracelet on the right we have used the 16mm base pendant settings as photo charms on a large link charm bracelet .  We used the 1" circle Butterfly sheet from Paperstreet for a nice vintage theme.

    All you really need here is our Hypo Cement Glue to first glue the picture to the pendant setting then once set apply a thin even coating of the glue to the surface of the photo, please be aware that the glue will set very quickly so you will need to put the cabochon in place as soon as you have applied it. Once the cabochon is in place you will need to apply some pressure for about 30 seconds to remove any air bubbles. Hypo cement will dry crystal clear enhancing your photo/image.
    TIP - We marked around the edge of the glass cabochon on the image/photo to get the correct shape and size and cut along it.


    Another great option is to use the Pendant settings with 'Glossy Accents™' instead of the glass cabochons. This fantastic product will allow you to let your imagination run wild!
    Glossy Accents™ is a clear, three-dimensional gloss medium, which you can use to accent, brighten, dimensionalise and magnify your altered art and photo charm jewellery projects. Place Glossy Accents™ under embellishments to make them stick and on top to protect and glossify! Dries to a hard transparent finish, and also works as a glue.
    If you want to give your jewellery more vintage look then try Crackle Accents™.

    We used Glossy Accents in the pendant setting above. We first applied a small amount into the pendant setting and glued the butterfly image into it, then we placed in a couple ofSteampunk Watch parts with words cut out from a newspaper and then simply poured in the Glossy Accents - being careful not to let it spill over the edge and then let it set for a couple of hours - the results were amazing.
    TIP - sandwich any photos/picture or newspaper clippings in clear sellotape when using with Glossy Accents to prevent the colours from bleeding.  Or you can use a sealant like Glue N Seal.

    Also, using double sided sticky tape we stuck the newspaper clipping to a peices of thin card and cut to size. This added some depth to the clippings making them stand out more.


    Another great range of products for making photo jewellery and for using Paperstreet supplies printable images is the Ranger Memory Glass and Frames.
    Create a personalised window of art by placing a piece of Memory Glass on top of your work/photo or sandwich between two pieces. Use a Memory Frame to hold the pendant together or use Memory Foil Tape instead - here you would need to use a Leaf Mounting Bail to make this into a pendant

    Layer your work to create the illusion of depth. Start with a background and add layers, distressing the edges with ink to create a shadow look aroung the image of text you are layering.


    If you don't have a photo editing programme like Photoshop then click here for free download of PAINT.NET photo editing software . Then follow instructions to download and install.


    http://collagesheets.paperstreetsupplies.com/digital-collage-sheets/pendant-images.html?ref=3&data=Blog

    Monday, 1 December 2008

    Jewellery bags and pouches - new arrivals


    Take a look at our new range of jewellery bags and pouches that we've added to give greater choice in addition to our popular organza jewellery bags.
    These will provide an alternative option to jewellery boxes to sell your jewellery in for your Christmas sales. As I've previously mentioned, well presented jewellery will increase the sales of your jewellery and give added value. Your customers would be more inclined to buy your jewellery as a gift at this time of the year and so it would be a good idea to sell your jewellery in a nice presentation box or bag, whatever suits your style and range.

    When pricing your jewellery make sure you include the cost of any presentation boxes or pouches into the final price. Display materials need not be expensive, you can find great value and quality jewellery bags and pouches at internationalcraft.com .

    Wednesday, 5 November 2008

    Jewellery Presentation Boxes


    With Christmas and the gift season fast approaching it is a good idea to consider the use of jewellery presentation boxes and pouches for the display and selling of your jewellery.

    Not only do they enhance the beauty of your jewellery pieces but they also help increase your sales. Your customers would be more inclined to buy your jewellery as a gift at this time of the year and so it would be a good idea to sell your jewellery in a nice presentation box. Not only would the box protect the jewellery piece, but it also allows your customer to present it as a gift.

    When pricing your jewellery make sure you include the cost of any presentation boxes or pouches into the final price. Display materials need not be expensive, you can find great value and quality jewellery presentation boxes at internationalcraft.com .

    Tuesday, 28 October 2008

    Elasticated Charm Bracelet - Stock


    As some of you have already noticed our Elasticated Charm Bracelet (Ref: F.1201.EL.SP) is out of stock.
    This was a new product we introduced last month and has been much more popular than expected. The result being that we sold out in a very short period of time. I have been informed that new stocks will be due at the end of November.
    The bracelet consist of an elasticated core which has been threaded through a silver plated chain. This gives the impression of a bracelet made up of hundreds of links. Jumprings have been attached all round the bracelet where individual charms and bead can be added.
    Thanks for your patience.

    Sunday, 14 September 2008

    Jewellery making with Pandora style beads

    Jewellery making with beads is a fun and rewarding hobby that can easily turn into a business and what better way to start than with the current hot fashion in the jewellery market, Pandora style charm bracelets and beads. Jewellery pieces can be made very easily with no skill. All you need is imagination to make stylish designs.

    Pandora bracelets were created by a Danish company using the best designers to create beautiful beads and jewellery using Italian Murano glass, Sterling silver and 18kt gold. They perfected a simple and flexible technique to create personalised and interchangable charm bracelets. In the past couple of years this concept of jewellery has become extremely popular with now a few
    celebrities wearing them.

    They work like all charm bracelets, allowing wearers to attach beads of their choice to a bracelet to create their own personalised jewellery piece with its own st
    ory. These beads are available in a range of materials and shapes from coloured glass beads with inner metal cores to solid metal beads. Shapes and symbols include animals, flowers, birthstones and letters. With such a range of beads to choose from it is very easy to create your own bracelet and just as easier to change it to suit your mood or your outfit colour. The art of designing your bracelets is fun and very easy.

    The only downside is that genuine Pandora beads are very expensive, with individual beads selling from £20 each up to £1000 a bead. However with all successful things, come cheaper copies. Now available are Pandora style beads and bracelets made with non-precious materials that are just as good but are a fraction of the cost. Learn how it works below.
    How it works
    • Select a base bracelet. These come in a snake chain style in lengths between 7 - 8". They come in silver plated and Sterling silver with differing clasp types.
    • Next choose clip beads. These are used to clip over the smooth section separators on the base bracelets. These decorative clips help keep the beads from bunching and falling off the bracelet. You usually require 2 - 3 clips per bracelet.
    • Finally select your Pandora style beads of choice. These beads all have a large inner hole that simply slide onto the bracelet. Choose from a combination of glass charm beads, metal charm beads and birthstone charm beads. Pick and slide your beads onto your bracelet in the order desired to achieve the look you want. Then apply your clip beads to separate the sections. If you are not happy with the look, simply unclip and slide off the beads and start again.
    For a full range of Pandora style beads at International Craft.